Shibori is a Japanese technique for pleating and resist dyeing fabric, it results in beautiful textures and colour effects.
This tutorial will give you a basic experience in Shibori felting techniques, to give you the basic skills to move on and experiment with the techniques yourself.
Method:
Please read the instructions through prior to commencing.
Make sure that you have the time and space you require to work, you don’t want to be called away half way through the felting process!
Trust your instincts, change the pebble layout to suit your self.
Step 1.
The scarf – I usually machine knit this, as I like to do things NOW!, but handknitting shouldn’t take too long as the gauge is loose.
With the standard gauge machine I cast on 60 sts and work 400 rows at a tension of 8 with 1 end of Handpainted yarns laceweight, if you are going to handknit I would suggest the same number of sts and rows on size 4mm needles, or larger if you like – we are looking for a piece of fabric approximately 50 x 14 inches.
You must use a yarn which will felt, pure wool or at least 80 % wool, not superwash.
If the label says that it can be machine-washed - it cannot be felted.
(you could also cut up a garment from goodwill, or that no one will wear)
Step 2
The ends,
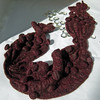
I usually wrap a rubber band around the ends of my scarf, approximately 2 inches in from the end, this gives a ruffled look to the end, alternatively you may leave it as is, but note that the end will become angled, due to the weight of the pebbles, I like this look also, but it is good to know what will happen.
tied not tied
The pebbles,
Layout your scarf fabric, wrong side facing, press it gently under a damp cloth if it is very creased.
The felting process means that your scarf will shrink by approximately half.
Place the glass pebbles in areas, I have suggested layouts, but feel free to choose your own.

When you are happy with the layout, use the rubber bands to tie the pebbles into the fabric, the pebble should be on the wrong side, and the rubber band on the right side, wrap the rubber band 3 x, and make sure the fabric isn’t pulled too tightly over the pebble.

Step 3
The pleating
In Shibori, the pleated areas stay pleated once felted, and the colour stays original if over dyed
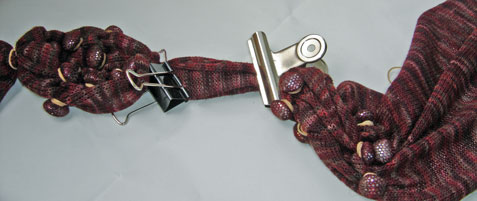
Using your fingers, gently pleat the fabric widthways as shown in photo, the pleats should be about 1 cm (1/2 inch) you can use a bulldog clip or peg to hold the pleats in place. 1 at each end of the pleat.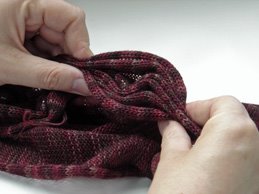
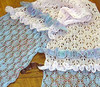
(omit the pleating step if you wish, you will end up with a scarf similar to the blue one above)
Step 4
Embellishment – sew on beads or buttons if you wish to, I use the same yarn as I knitted the scarf with, when you sew them on prior to felting the yarn felts into the fabric, and the beads bed down slightly into the felt.
Step 5
The felting
Washing Machine:
Fill the machine to the medium level with hot water ( I usually fill it, and add a jug of boiling water – as my hot water temperature is low, as we have children in the house) add 2 T pure soap and agitate to mix, place the scarf into a pillowcase or lingerie bag and secure with a rubber band, place in the washing machine with a couple of old towels, or anything else that won’t be affected by the small amount of dye which will run. (a friend of mine washes her sneakers with her felting!)
The time taken to felt the scarf will vary, depending on temperature, time, and the mood of the yarn on the day, take it out after 5 minutes and have a look, if it is barely felted leave it in for a few more minutes before checking again (you may have to add time to the wash cycle), if it is looking pretty close but not quite, then check it every minute, I have noticed that in my top loader it takes a full wash for my scarf to be perfectly felted. Once you are happy with the felting (it is always better to UNDER-felt) place the scarf in warm (not cold) water to rinse, gently squeezing until the soap is gone, rinse again in clean water, roll in a towel and sqeeze out excess water, place flat on top of a dry towel, adjust the look by pulling at the fabric gently ( don’t remove any pebbles, or rubber bands yet, you can remove the bulldog clips , if the felting is too tight there, GENTLY prise apart in the middle, leave the ends as this is where the pleats are secured. If you are planning to overdye the scarf DO NOT remove the bulldog clips.
Hand felting:
(use rubber gloves) fill a basin with very hot water, add 2 T soap , fill another basin with very cold (use ice) water. Place the scarf in the hot water, agitate and squeeze water through the fabric, squeeze out and place in the cold water, alternate between the two until sufficiently felted. Rinse in clean warm water.
Now, if you are going to over-dye the scarf, you can do this in a couple of ways:
- Kool-aid, or food colouring,
Fill a medium sized saucepan with warm water, mix in the dyestuff, stir well, place the scarf in the pot, and the pot on the stove, heat over a low to medium heat until it just starts to boil, remove from the heat and leave to cool ,(overnight if possible) when cold remove the scarf, rinse gently in warm water, roll in towel to remove excess water, place on flat towel to dry. (as before) remove clips if desired, and adjust pleats.
- Fabric dye – follow the instructions on the box, if it calls for heat, just be sure not to agitate the scarf during the process.
- You can also handpaint the scarf with more than one colour and set in the microwave.
When dry:
Gently remove the rubber bands, you can snip these with scissors but be careful! Alternatively, save them for next time.
Then remove the pebbles by popping them gently out of the little hole at the back. Cute huh!
As before you can gently prise the pleats apart, to get the desired look .

now just wrap around your neck and fasten with a decorative pin!