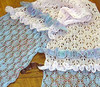
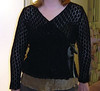
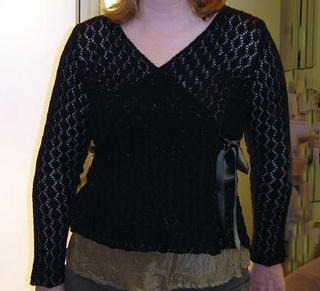
This has been an interesting project, I started out wanting to make myself a black lace cardigan…I had lost my Manon Salois cut and sew book, and decided I didn’t want to face cut and sew lace without it, so created a fully-fashioned pattern, no more time consuming in the long wrong and a lot less stress. I made it for myself, for my measurements and fashion quirks. I can see a lot of colour and pattern potential in this style like how the cardigan can be adapted to sit neatly, or asymmetrically, or even as a sweater. It is a very forgiving pattern.
I decided to write the pattern up, and if any brave souls want to give it a try, then best of luck to them, and I hope my gibberish makes sense, I received a number of emails from friends and allies suggesting that this should not be a free pattern, and I gave this idea much thought, a lot of time and energy is expended in creating a garment from scratch, but I feel most people appreciate this and would not take advantage. I had thought about presenting it to a Machine knitting magazine, but there are precious few of those around, and frankly at present I do not have the energy to spend working up the pattern in different sizes, and writing clear instructions. I expect that anyone who does tackle this project would have a basic understanding of machine knitting, and would know where to research a term like “e-wrap”.
I apologise in advance for the lack of clarity in the pattern, I have yet to write patterns to “Knitty standard” but I am learning, I would suggest that prior to doing the shaping that you write yourself a list of numbers- the rows that you need to inc or dec on, that way you don’t need to think as hard while you are knitting. I wrote a separate column of numbers for each section, dec on back, inc on back, inc on sleeve, dec on front etc, and that you have a system, so you know when you have inc’d / dec’d (eg pulling needle out to HP)
That said, this is my pattern, I created it, I own it, I would LOVE to see pictures if you do make it, I don’t mind you making it for a friend, if she pays you for the yarn and your time…fine…but do not infringe on my copyright by using this pattern for commercial gain.
Imogen – allover lace fitted wrap cardigan.
Tension 40rows x 26stitches = 10cm (4 inches)
Yarn I used 2 ends of laceweight wool, so a 3ply or thin 4 ply.
Notes:
Once again, these are not precise instructions…more of a guide.
I have not used a hem or rib, as my fabric lies flat after steaming, and the lace makes a nice edge .Make a test square, if the fabric does not lie flat after steaming you will have to add a hem, I would suggest stst on the back of the hem, lace on the front (and a different colour on the stst will show through the lace and add a nice touch) use a tighter tension for the hem.
Size: medium 36 inch bust
If you want it smaller or larger add or subtract some stitches. You will have to adjust the dec and incs, use a programme like “Knitware” it has a magic equation facility.
Pattern: I used a small falling leaf lace from the handmade mylars lady I bought the machine from. It is an 8 st repeat.
I call a “row” the use of the knit carriage, (and row counter) the lace carriage does not knit rows.
Any problems let me know.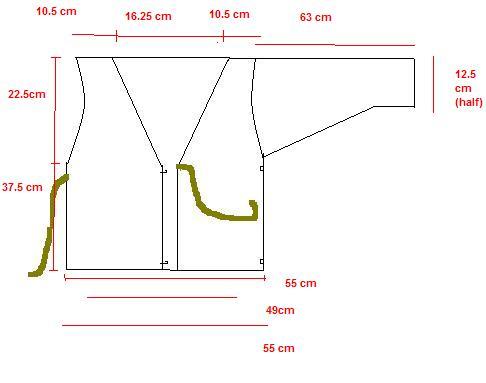
Cast on for back:
150 sts cast on with waste yarn, knit a few rows, then e-wrap all needles with main yarn.
K 2 rows plain
Commence lace pattern RC 000
Dec 1 st each end every 10th row 4 x
Dec 1 st each end every 9th row 4 x (76 rows)
Knit 2 rows
Inc 1 st each end every 9th row 4 x
Inc 1 st each end every 10th row 4 x (RC 154)
Armhole shaping
Dec 2 sts beg next 4 rows
Dec 1st armhole edge beg next 40 rows (RC 198)
Work 50 rows straight
Hold 14 sts beg next 4 rows
Cast off on waste yarn(RC 252)
Cast on for front:
98 sts 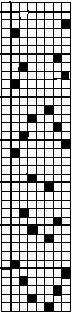
K 2 rows plain
Commence lace pattern RC 000
At side edge
Dec 1 st at each side seam edge every 10th row 4 x
Dec 1 st at each side seam edge every 9th row 4 x (76 rows)
Knit 2 rows
Inc 1 st at side seam edge every 9th row 4 x
Inc 1 st at side seam edge every10th row 4 x
AT THE SAME TIME at RC 112
Start dec on neck edge
Dec 1 st every 4th row 6 x
Dec 1 st every 3rd row 38x
AND at RC 154
Dec for armholes at side edge
Dec 2 sts at side edge beginning next and alt row (4 rows total of 4 sts decreased)
Dec 1 st armhole edge beg next 40 rows
Work 50 rows straight (RC 248)
Hold 14 sts at side edge next 4 rows ( 28 sts held) cast off on waste yarn
Cast on for sleeve
Cast on 64sts
K 2 rows plain
Commence lace pattern RC 000
Work 58 rows
Inc 1 st each end every 8th row 13 x
Inc 1 st each end every 7th row 4 x
Cast off 2 sts beginning next 4 rows
Dec 1 st beginning next 62 rows
Cast off by linker or chain st cast off.(RC 240)
To make up
As a jumper:
You will need to sew the front, back and other front together in the side seam.See instructions below for the rest.
As a cardigan:
Join left front to back,(wrong side facing you, right sides facing each other) by picking up stitches from waste yarn, knit 1 row at max tension, cast of loosely. Do the same with the right.
Do not unravel the waste yarn yet, as you still have live sts at back neck.
Sew up the (wait a minute! Attach the ribbon about 8 inches up from the bottom on one side)side seams, matching carefully, (I used a sewing machine), sew sleeve seam, then sew into armhole.
Back at the knitting machine, work a false cable (wiggly worm) along fronts and back neck, as follows:
Wrong side facing, pick up and place 3 sts on needles, work 4 rows at tension 8, pick up the next 3 sts (use a 3 needle tool, it will give the right spacing), place on the same 3 needles, work 4 rows, continue in this manner until all stitches have been worked (including live sts from back neck)
Now you can fasten, this is how I did it, but experiment! You can use a brooch or stick instead of the ribbon, or a big kilt pin.
I attached hooks and eyes to fasten the inner side of the wrap, one at the bottom, one a couple of inches below the armpit. You have already attached a piece of ribbon to one side, on the other front, carefully sew another length of ribbon to the corner where you started decreasing the front.
Enjoy