I have had a couple of emails from people who for whatever reason cannot read .pdfs, so here is the Natural dyeing tutorial, but before I start with that, this weekend whilst making Yoga (Pilates) socks for my Mama, (2 on 2 circs, took me a bit to figure out, but now I'm rip roaring along) I had a realisation, the Yoga Socks pattern can be simplified to almost nothing, thus:

Dyeing wool with organic material
(And no harmful chemicals!)
Dyeing is just magic! You take ordinary household ingredients, some bits of plants, boil them together and “hey presto!” you have colour. Get your kids to join in, just make the tasks age appropriate, and they will have a story to tell their friends, a doozy of a “show and tell” and warm fuzzies about wool and nature.
This tutorial is basically teaching you how to test dye with plant materials, it will give you the skills to go on and experiment with plants from your local area.
I am a knitwear designer and manufacturer, currently I make 2 clothing ranges for babies, basically one is organic the other is not, the organic range is made from certified organic, undyed cream merino wool, beautiful in itself, but I felt the need for an injection of colour. I spoke to the yarn manufacturers, who explained to me that it is very difficult to find commercial organic dyes, and the metals used to mordant the wool are poisonous, so at the moment they choose not to dye, which is understandable. I didn’t want to use food type dyes (drink mixes, food colouring etc) because I figured that the parents who are buying organic don’t want food colouring inside their kids and wouldn’t want artificial colouring on their kids clothes.
I remembered back 15 years when I played at dyeing yarn with plant material, I grew madder (the plant, not a state of mind!) coreopsis and woad, I gathered lichen and boiled it up to release lovely apricots and tans, I didn’t keep any details of these exploits, but I remembered enough to get started.
A few of the trees on our new property are dripping with a lichen called “Old Man’s Beard”, it is green and hairy, and comes of the tree easily, chopped finely and boiled it releases a tan dye with no need for mordants, the bright oranges it gives up help us to understand that our ancestors did not live a black and white existence, that they had a need for colour, and found I in the most unusual places.
There is another common lichen here, which grows in frilly circles; it often has a black covering on the back which helps to make the dye a darker shade.

I also picked up some plant materials from a craft shop, Rose Madder (ground), Cutch (a type of resin), Cochineal (the famed bug) and Brazil wood sawdust.
Next came the testing, skeins of 10metres worth of wool were wound, and each was tied differently, so that I could remember which mordant I used for each skein e.g. 3 ties, 4 ties, ties with 1, 2 or more knots. I suppose we should go into tutorial mode now, so here are the instructions step by step.
1) Gather together your equipment, I use a couple of old saucepans from the op shop, both have lids and both are clearly labeled “Mum’s dyeing” which never fails to illicit gales of laughter from the kids. You will also need a sieve, at least 4 small bowls, 2 larger bowls for rinsing and soaking, a wooden spoon or two, plenty of rags for wiping up spills, an apron and something to protect your kitchen from splashes ( plastic tablecloth). If you have the space, consider using a gas burner and doing your dyeing in a garage or in the back garden, cooking up that plant material can pong a bit! You will also need pen and paper to keep a record of your experiments.

2) Make sure you have your plant material in a usable state, chop leaves or lichen finely, have dry spoons to measure out your dry materials (make sure that everything you use for dyeing remains for dyeing – these dyes aren’t poisonous, but it is just good practice when dyeing) Assemble your mordants (these are chemicals which help the colour “bite” into the yarn – I am only using non-poisonous mordants in this tutorial) you could use Table salt, cream of tartar, bicarbonate of soda, citric acid or vinegar – all of these should be available from the supermarket – try the baking section.
3) Skein your yarn (use non-superwash wool only, as superwash is hard to dye evenly, these dyes only work with wool) you will need a skein for each plant you wish to use, and for each mordant you are planning to use with each plant. E.g. say you want to dye with Cochineal, you want to try citric acid, vinegar and cream of tartar as mordants, you also want to try one skein without any mordant, so you make up 4 trial skeins, and tie each one differently – as I mentioned before I use 4 plain ties for skeins with no mordant, 3 ties for skeins using cream of tartar, 4 ties with 2 knots for bicarb of soda – come up with your own method, then WRITE it down! In the heat of the moment you will not remember – ask me how I know!
4) Place the number of skeins you will be using in a bowl of warm water and leave at least an hour, now you can make the dye.
5) Place the dye material in a saucepan with the water, I started with 1 teaspoon of dry material to 1 litre water, with lichen I use 20grams to 1 litre, and with leaves I would use at least a cup of fresh chopped leaves to a litre. Bring to a boil (watch carefully to ensure no boil overs) then simmer for at least ½ an hour, strain through a muslin (or teatowel) lined sieve, and pour the resultant liquid dye into separate bowls for each mordant (or not) that you are using.

6) Pour 1 bowl of dye back into the (now rinsed) dyepot, add the skein and the mordant (try a ¼ teaspoon to start, add a little more if you wish) and add a little water if it is too low, simmer for at least 10 minutes. If you were dyeing a larger quantity of yarn I would recommend simmering until the water is almost clear, but that is unlikely to happen with these test skeins.

7) Remove the yarn and place in a bowl of clean, warm water, rinse until the water is clear, squeeze out excess water and place on a towel to dry a bit. Repeat the process until you have used all of your skeins, if you find a particularly nice colour you may wish to dip dye one of your earlier skeins, just place part of the skein in the dye pot and let the rest sit on the handle or side of the dye pot (careful not to let it near the element) leave to simmer for 10 minutes.
Finally hang your skeins in the shade to dry, make notes of any that bleed colour or fade upon drying. I hang my test skeins half in- half out of a shoe box in the sun for a couple of weeks, using some commercial yarn as a control, then I can ascertain whether a dye is going to fade too quickly to make it useful.

8) You will notice that your skeins may be very different shades or even different colours, this is the action of the mordants, and using your notes you can now go on and dye larger amounts of yarn, varying the amounts of mordant and dyestuff to suit. Keep detailed notes of all aspects of your experiments, especially when using fresh materials – was it spring or winter when you collected them? Which part of the plant did you use? This way you may be able to get repeatable shades.
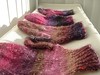
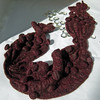
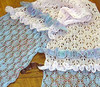
Here are my results:
Madder, mordants from bottom to top: vinegar, citric acid, baking soda, baking soda plus cream of tartar.

Cochineal beetles, mordants from left to right:
Salt, baking soda, cream of tartar, citric acid, no mordant.

Cutch, mordants from bottom to top: baking soda, vinegar, citric acid, cream of tartar.

Lichen (Old mans beard)
From bottom to top:
No mordant, no mordant, citric acid (brighter orange)
Brazil wood, dyed skeins first with no mordant (apricot colour), then removed skeins and added 1 tsp baking soda to the pot, purple colour emerged!, dip dyed skeins.
The internet and library have loads of resources, books of dye plants, and more involved dyeing instructions, this is just a simple tutorial to introduce you to natural dyes without the drama of using harsher mordants, if you don’t have little kids around you may want to pursue the metal mordants and chase the really exciting colours that they provide.
Websites you might like:
White Dragon – article about historical dyes
Pioneer Thinking – good list of plants to consider
Florilegium – wonderful plant list and resource


